
You can give team members access to your WordPress website by creating a user account for each person. Each user gets a role that controls what they can see and change.
Before you start: you need the Administrator role to add users. If you're not sure which role someone needs, or you want to give someone Administrator access, check with Gate 39 first.
Add a new user
- Log in to your WordPress admin (usually
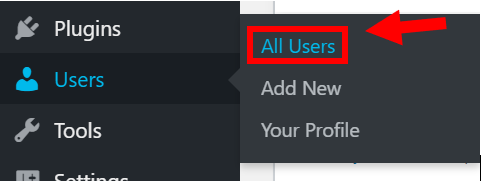
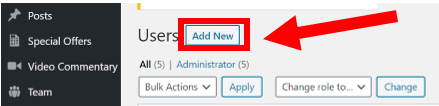
yourwebsite.com/wp-admin). - In the left sidebar menu, go to Users, then click Add New User. In some versions, you click All Users, then Add New.
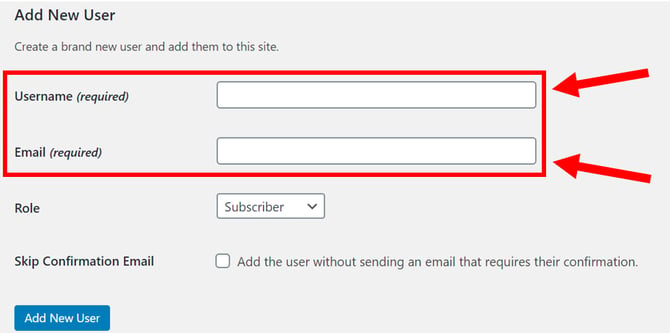
- Fill in the user's details:
- Username (required): this can't be changed later.
- Email (required).
- First name, last name and website (optional).
- Password: WordPress creates a strong password automatically. Leave it as is, so the user can set their own through the notification email, or replace it with your own strong password.
- Keep Send User Notification checked to email the new user their login details and a link to set their password.
- Choose the user's Role (see below).
- Click Add New User.
Choose the right role
WordPress includes five default roles. Give each person the lowest role that lets them do their job.
- Administrator: full control of the site, including settings, plugins, themes and users. Only give this to people who manage the whole website.
- Editor: can create, edit, publish and delete any posts and pages, including other users' content. Can also manage comments and categories. Can't change site settings, install plugins or themes, or manage users.
- Author: can write, edit, publish and delete their own posts, and upload images and files. Can't edit other users' content or pages.
- Contributor: can write and edit their own posts but can't publish them or upload files. An Editor or Administrator must review and publish their posts.
- Subscriber: can only log in and update their own profile. Useful for sites with members-only content.
Please note: plugins can add more roles.
- WooCommerce sites: Shop Manager can manage products, orders and customers without full admin access. Customer is given to people who create an account at checkout.
- Membership and other plugins may add their own roles. Contact Gate 39 if you're not sure what a role can do.
Change a user's role
- Go to Users > All Users.
- Hover over the user's name and click Edit.
- Choose a new Role, then click Update User at the bottom of the page.
Remove a user
When someone leaves your organization, remove their access promptly.
- Go to Users > All Users.
- Hover over the user's name and click Delete.
- When asked what to do with their content, choose Attribute all content to, then select another user. Otherwise, their posts and pages will be deleted.
- Click Confirm Deletion.
Keep your website secure
- Limit Administrator accounts to the fewest people possible.
- Give everyone their own account. Never share logins.
- Use strong, unique passwords and a password manager.
- Turn on two-factor authentication if your site supports it. Gate 39 can help set this up.
- Review your user list regularly, and remove anyone who no longer needs access.
Need help? Contact the Gate 39 team through the Customer portal.