Create a form
- In your HubSpot account, navigate to Marketing > Lead Capture > Forms.
- In the upper right, click Create form.
- In the left panel, select Regular form.
- In the upper right, click Next.
- In the left panel, select Blank template to start with a blank form, or a pre-made template to start with a form with fields for a specific use case. The form preview for a selected template will appear in the right panel.
- In the upper right, click Start.
- At the top of the form editor, click the pencil icon edit to edit the form name.
![]()
Add and edit form fields
- In the left panel, use the search bar to search for a field, or browse through your property groups. To create a new contact property and use it as a field on your form, click Create new next to the search bar.
- Drag and drop fields onto the form preview on the right to include them on your form. Fields can be placed above, below, or next to other fields.

- To create a ticket from each form submission, click to toggle the Automatically create tickets switch on. This will connect the form to your conversations inbox where your team can respond to customer's inquiry.
- To edit a field's display options, click the field in the form preview on the right.
- In the left panel, edit the field's options as needed. The options here may vary depending on the field's property type:
- Label: the name of the field that will appear on the live form.
- Help text: informational text below the field's label to help the visitor complete the field.
- Placeholder text: text that appears in the input box for the field. The text will disappear when the visitor enters a value in the field, and will not come through in the submission, even if the field is left empty.
- Default value: a value that will be submitted for the field by default unless changed by the visitor.
- Progressive field options: select the action to take if the field has been previously submitted.
- Make this field required: when the checkbox is selected, the field must be completed to submit the form.
- Make this field hidden: when the checkbox is selected, the field will not appear on the form, but can be used to pass values to contact properties for all submissions.
You can also add rich text areas between form fields to add customizable text, create headers, or add spacing to your form.
Create a follow-up email (Optional)
- At the top, click the Follow-up tab to create a follow-up email that a visitor will receive after submitting the form. This step is optional.
- Click Create follow-up email.
- In the right panel, customize the details of your follow-up email:
- Subscription type: click and select the subscription type of your follow-up email.
- From user: click and select the sender of your follow-up email.
- Subject line: add a subject for the follow-up email.
- Body: add email body text to continue engaging your contact.
- Edit email footer: click to customize your company's name and address in your email configuration settings.
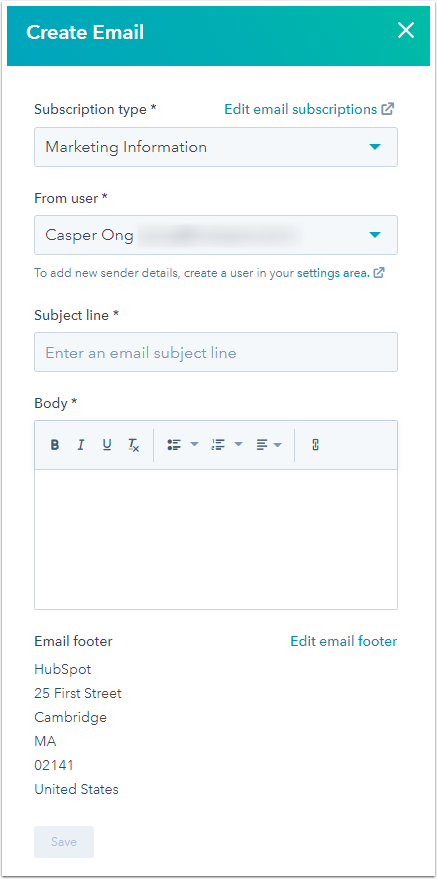
- Once done, click Save. A brief preview of the email should appear. To add another follow-up email, click Add another email.
Customize your form options
- At the top, click the Options tab.
- Customize the settings for your form as needed:
- What should happen after a visitor submits this form: choose to display a thank you message to your visitors or redirect them to another page after they submit the form.
-
Follow-up options: select the Send submission email notifications to the contact's owner checkbox to automatically send a notification to the contact's owner.
-
Send submission email notifications to: click the dropdown menu to select the default teams or individuals to send submission email notifications to, regardless of contact ownership. Recipients set here will be overwritten by recipients set in the form options on HubSpot pages.
-
Form and error message language: select the language for default field labels and errors displayed to visitors who don't fill out the form correctly.
-
Always create contact for new email address: select this option to create a new contact record for every submission with a unique email address. If the email address submitted matches an existing contact record in your database, the details on the existing record will be updated. When this option is enabled, the Pre-populate contact fields with known values option won't be available.
-
To allow visitors to remove any pre-populated fields on the form and create a new contact on submission, select the Add link for users to reset the form checkbox. When this option is selected, visitors who see form fields pre-populated with their own or someone else's information can click a Not you? Click here to reset link that resets the form. This will also disable cookie tracking in the form submission, which prevents any cookie overwrites.
- Pre-populate fields with known values: if a contact has previously visited your site and submitted a form, and HubSpot was able to store and track their cookies, any known field values can be pre-populated on the form. With this option enabled, visitors can save time filling out subsequent forms on your site.
This option is enabled by default. To disable this option, click to toggle the Pre-populate fields with known values switch off.
Style and preview your form
- At the top, click the Style & Preview tab. A preview of the form will update in the right panel as you adjust the form's styles or test its features.
- Theme: select one of four available themes for field and button styles.

- Style: customize the form's width, fonts, and colors.
- Test: if you have progressive profiling or dependent fields on this form, you can test how they'll appear to your visitors.
Publish your form
In the top right, click Publish to take your form live and make it available for use on HubSpot pages. You can also embed your form on an external website or share it as a standalone page.