Types of lists
There are two types of lists in your HubSpot account: active lists and static lists.
Active lists
- Active lists automatically update their members based on its criteria.
- Contacts will join the list when they meet the criteria and leave the list when they no longer meet the criteria.
Examples of when active lists should be used include:
- sending unique marketing emails based on each contact's behavior and properties. If you send out a regular newsletter, an active list automatically manages the continually changing list of subscribers.
- placing outbound calls to contacts based on contact behavior and property values.
- grouping your contacts by lifecycle stage and to identify behavior and properties for contacts in each stage using up to date data.
- segmenting contacts based on properties that change frequently over time.
Static lists
- Static lists are snapshots of the contacts who meet a set criteria at the point when the list is saved.
- Static lists do not update automatically.
- New contacts who meet the criteria will not be added to the list.
- Contacts can be manually added and removed from static lists.
Examples of when static lists should be used include:
- manually add contacts to a workflow.
- send one-time email blasts, email campaigns that you don't run often, and for a list of contacts that doesn't change (e.g., event attendees, staff lists for an internal newsletter, or lists from a trade show).
- manually group contacts that may not have a shared list criteria.
- segment contacts to bulk delete contacts from your account.
Set Up a New List
- In your HubSpot account, navigate to Contacts > Lists.
- In the upper right, click Create list.
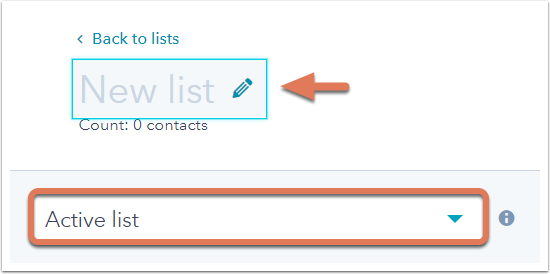
- In the top left, click the pencil icon edit and enter a name for the list.
- In the upper left, click the dropdown menu and select whether the list you're creating should be an Active list or a Static list.
- In the left panel, set the criteria for the contacts you want to work with.
- Once you've set your criteria, click Apply filter. Contacts that fit this criteria will populate in the table. This is a preview of the estimated number of contacts that will be added to your list.
- In the upper right, click Save. Your list may take some time to process.
Once the list has finished processing, you can continue editing your list.
Access and Edit a List
- In your HubSpot account, navigate to Contacts > Lists.
- Click the list you want to access or edit.
- To search for a specific contact in your list, use the search bar in the upper right.
- In the upper right, click the Actions dropdown menu to perform more actions with your list:
- Edit columns: select the contact properties to display for each contact in the table.
- Export: download a copy of the list.
- Test a contact: check if a specific contact meets the list criteria.
- Move to folder: select a list folder to move the list to.
- Clone: clone the list.
- Delete: permanently deletes the list. You can only delete lists that aren't actively being used elsewhere in HubSpot. Contacts in the list will not be deleted.
- Create a report: build a custom report based on your list.
- View list performance: allows you to analyze your list's metrics, such as the list's size over time, and the breakdown, engagement, and activity of the list's contacts.
- Resync list with Salesforce (Professional and Enterprise only): triggers a resync of the list with Salesforce if you're using the Salesforce integration.
- Use this list to limit Salesforce Sync (Professional and Enterprise only): allows you to specify the list as an inclusion list for contacts that will sync to Salesforce, if you're using the Salesforce integration.

In the table, you can sort the contacts based on their property values by clicking the headers.