Import to create or update records of one object type in one file
Follow these steps when you want to bulk create or update records of only one object type (e.g., creating only deals). Ensure your file contains only one object type (e.g., the file contains only contacts).
- Ensure that your import file is already set up correctly.
- In your HubSpot account, navigate to your contacts, companies, deals, tickets, or products.
- In the upper right, click Import.
- Click Start an import.
- Select File from computer, then click Next.
- Select One file, then click Next.
- Select One object, then click Next.
- Select the object type in your import file.
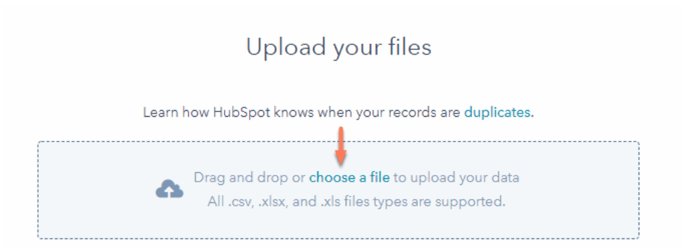
- Click choose a file and in the dialog box, select your import file. In the bottom right, click Next.
- On the Map columns in your file to contact properties screen, HubSpot will match the columns in your file to your selected object type's properties based on the header and the property name. You'll see a preview of the property values from your spreadsheet in the Preview Information column.
- If any columns do not match an existing property, click the corresponding dropdown menu. You can do opt to do one of the following:
- Select an existing property to map the column to.
- Click Create a new property to set up a new custom property in the right panel. The data in the column will now be mapped to this new custom property.
- Select Don't import column to skip importing this column from your spreadsheet.
- If you're not intending to import any data in the unmatched columns, you can select the Don't import data in unmatched columns checkbox to skip these columns.
- Once all columns are mapped or you've opted not to import data in the unmatched columns, click Next.
- On the details screen, enter an Import name.
- If you're importing a file with only contacts, select the Create a list of contacts from this import checkbox to automatically create a list when the contacts are imported.
- If you're importing a file with a date property, use the Date format dropdown menu to confirm how the date values in your spreadsheet are formatted.
- If you've turned on General Data Protection Regulation (GDPR) functionality in your account, use the Set the legal basis for processing a contact's data dropdown menu to select a lawful basis of processing.
- Once you've set the options for your import, click Finish import in the bottom right.
Import to create or update records of multiple object types in one file
Follow these steps when you want to bulk create or update records of different object types in one file (e.g., the file contains contacts, deals and notes).
When data on different objects are in the same row in the import file, the two records that were on the same row will be associated upon import.
- Ensure that your import file is already set up correctly.
- In your HubSpot account, navigate to your contacts, companies, deals, or tickets.
- In the upper right, click Import.
- Click Start an import.
- Select File from computer, then in the bottom right, click Next.
- Select One file, and click Next.
- Select Multiple objects, and click Next.
- Select the types of objects in your import file. Then, click Next.
- Click choose a file, then select your import file.
- Click Next.
- On the Map columns in your file to contact properties screen, HubSpot will automatically match the columns in your file to properties in your selected objects. You'll see a preview of the property values from your spreadsheet in the Preview Information column.
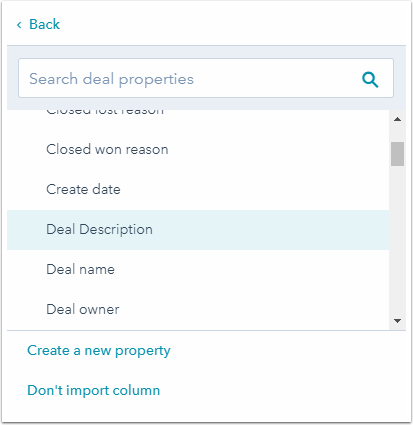
- If any columns do not match an existing property, click the corresponding dropdown menu:
- If you want this column to map to an existing property, select which object's properties you need to match, then select a property.
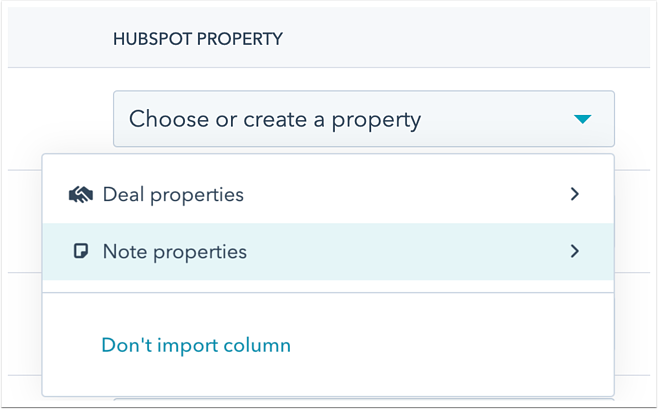
- If you want to match the column to a new custom property, select the object then click Create a new property. In the right panel, set up your custom property.
- If you don't want to import this column, select Don't import column.
- If you don't want to import any columns without a matching property, select the Don't import data in unmatched columns checkbox.
.webp)
Note: when importing a note, there are two fields you must include in the import file: activity date and note body. The values for these fields are not stored in a property, but they are included in the note engagement on the record's timeline.
- After you've mapped all of the columns from your file, click Next.
- On the details screen, enter an Import name.
- If you're importing a file with a date property, use the Date format dropdown menu to confirm how the date values in your spreadsheet are formatted.
- If you've turned on General Data Protection Regulation (GDPR) functionality in your account and your import includes contact records, use the Set the legal basis for processing a contact's data dropdown menu to select a lawful basis of processing.
- Once you've set the options for your import, click Finish import in the bottom right.